I joined the banner trend bandwagon with this card and I must say I like banners on cards.
The banners were just a strip of a party confetti print paper that snipped into five pieces and cut the V shape into. To thread my floss through, I pulled out my Big Bite to make small holes on the top. I only attached it behind my cardstock base so you move the banners and it flaps around when you move it.
I pulled my Spellbinders ovals out to stamp the sentiment on; they have proven to be a valuable investment in my paper crafting time and again!
Paper: PTI - Blueberry Sky, Canyon Clay; The Paper Studio - Birthday Extravaganza stack - path confetti
Ink: PTI - Dark Chocolate
Stamps: Movers & Shakers
Embellishments: Lime green floss, Cuttlebug - circles embossing folder, Spellbinders - Ovals
Other: Cuttlebug, Crop-a-dile Big Bite
Getting crafty with paper
Masculine Banner Card
Posted by Jenny at 11:24 PM Labels: birthday, cuttlebug, masculine, papertrey ink, spellbinders
Askew Card Set
Posted by Jenny at 10:49 AM Labels: blank cards, card set, copics, papertrey ink
This is the first card set I have made. I made it back in January while at craft retreat but they have been sitting on the shelf as I couldn't figure out what I was going to do with the missing element--an outline around the edge. I really wanted to stitch the border on the pale pink cardstock, but I forgot until after I had adhered all them together with permanent adhesive.
Then it dawned on me--I could do an outline border with yellow marker!
After I stamped the image, I colored in areas with my Copics. The pearls were adhered with Glossy Accents and aren't going anywhere!
This set I left free of sentiments. The inside is simply stamped with a single flower on the kraft cardstock.
Ink: PTI - Autumn Rose
Embellishment: The Paper Studio - pearls, PTI - Lemon Tart twill ribbon
Other: Copic - BV0000, Y11, YG11; Sharpie Ultra Fine - yellow; acetate box
Then it dawned on me--I could do an outline border with yellow marker!
After I stamped the image, I colored in areas with my Copics. The pearls were adhered with Glossy Accents and aren't going anywhere!
This set I left free of sentiments. The inside is simply stamped with a single flower on the kraft cardstock.
I put them in an acetate box I adorned with a yellow ribbon. The four of them fit perfectly in the box with room to spare for the envelopes.
Paper: Papertrey Ink - Sweet Blush, Autumn Rose, KraftInk: PTI - Autumn Rose
Embellishment: The Paper Studio - pearls, PTI - Lemon Tart twill ribbon
Other: Copic - BV0000, Y11, YG11; Sharpie Ultra Fine - yellow; acetate box
Father's Day
Posted by Jenny at 10:09 AM Labels: cuttlebug, masculine, papertrey ink
I just realized I hadn't posted a card for Father's Day (or Mother's Day but that is another post).
Tada! Better late than never, right? :) I grabbed this patterned paper at my local craft house because I knew it would be great for masculine cards. For texture I ran brown card stock through my paper crimper. I chose to put the Father's Day sentiment on a curvy die cut to echo the curves in the paper. I sure wish dies for the On the Links set would come out...
Paper: Webster's Pages - Tennis Anyone?, The Paper Studio - brown, PTI - Vintage Cream and Enchanted Evening
Stamps: PTI - On the Links and Happy Day
Ink: PTI - Enchanted Evening, Pure Poppy, and Simply Chartreuse
Embellishments: PTI - Happy Day die, Marvy Uchida - paper crimper
Other: Cuttlebug, craft knife
Paper Rose Tutorial
Posted by Jenny at 3:38 PM Labels: cuttlebug, paper crafts other than cards, papertrey ink, spellbinders, tutorial
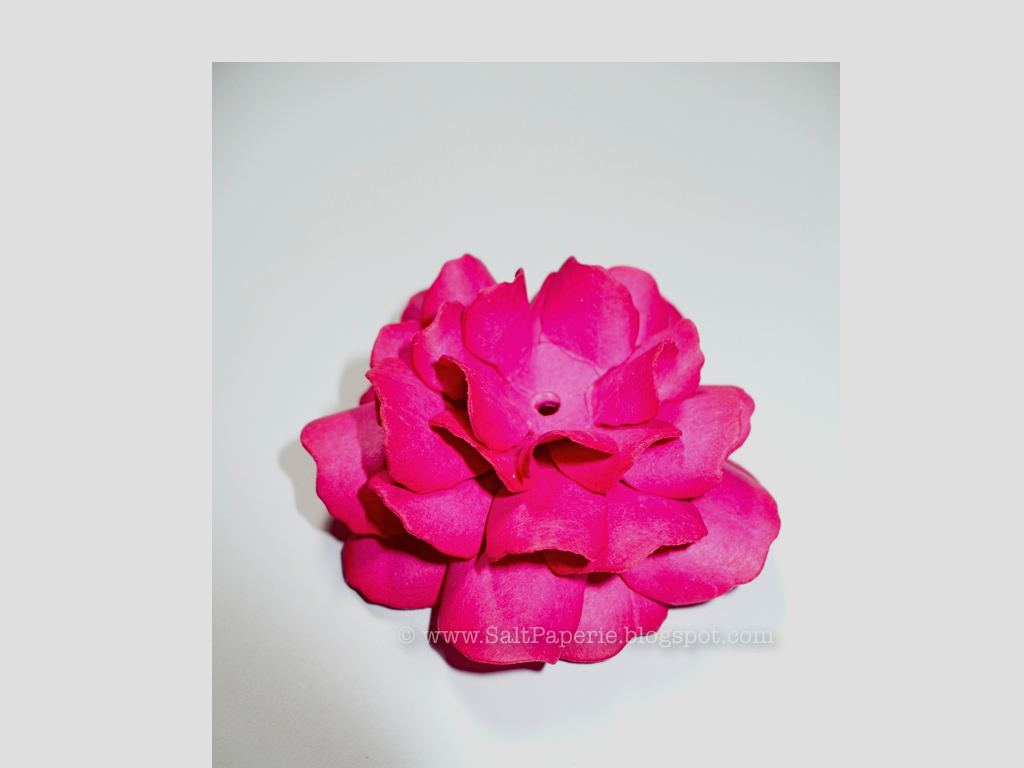
A few months ago I came across this great video tutorial on Youtube on how to use the Rose Creations dies by Spellbinders to make fabulous paper roses. Not only does the lady who made video go step by step, but the results were easy (but a bit time consuming) to recreate. My husband insisted that I take pictures to show the process as he too was amazed. The video shows this all in much greater detail. I highly recommend watching it as I am sure there are gaps in my explanation and at least for me seeing it being done really helps.
First, I cut two flowers from four different sizes from PTI Raspberry Fizz cardstock--this cardstock takes this technique beautifully. Quickly dab the edges of the petals with ink. The lady from the video suggests Versamark watermark which works well. Next, using a bone folder, you curl each side of the pedals creating a V except for your two smallest pieces.
The smallest pieces you 'cup.' She uses a nifty ball bearing tool but I don't have one so I used one of my Cricut tools that has a rounded metal back and pressed it in a circular motion quite hard on top of a piece of fun foam. My cupped flowers are not as tight as hers but they worked.
Glue what ever you wish in the center of one of the smallest flowers and when dry, glue a small part of the edge of a petal to the one next to it all the way around the flower. I found that Zip Dry glue works really well for this. It gets rubbery and elastic when dry (and dries fast) and you can position the petals pretty realistically wit the give.
Glue the cupped flowers in the middle. You may need to fuss with the petals a bit to get the look you want.
That is it. A little work and you can create these pretty paper roses.
First, I cut two flowers from four different sizes from PTI Raspberry Fizz cardstock--this cardstock takes this technique beautifully. Quickly dab the edges of the petals with ink. The lady from the video suggests Versamark watermark which works well. Next, using a bone folder, you curl each side of the pedals creating a V except for your two smallest pieces.
The smallest pieces you 'cup.' She uses a nifty ball bearing tool but I don't have one so I used one of my Cricut tools that has a rounded metal back and pressed it in a circular motion quite hard on top of a piece of fun foam. My cupped flowers are not as tight as hers but they worked.
Glue what ever you wish in the center of one of the smallest flowers and when dry, glue a small part of the edge of a petal to the one next to it all the way around the flower. I found that Zip Dry glue works really well for this. It gets rubbery and elastic when dry (and dries fast) and you can position the petals pretty realistically wit the give.
Next, glue each of the same sized petals together. Be sure to stagger the petals for a realistic look. These are the largest flowers glued together here, which will be the base.
The next size set of flowers get glued together and then glued to the base.
By the time you go to glue the third set of flowers, you'll need to position them into the petal crowded area. I found that holding them down by pinching the top to the base with my thumb and index finger helped while they dried.
That is it. A little work and you can create these pretty paper roses.
Mother's Day Card
Posted by Jenny at 8:41 PM Labels: copics, cuttlebug, papertrey ink, spellbinders
I just realized I hadn't posted a card for Mother's Day (and Father's Day).
How could I not post this beauty?! Well, if you must know, I usually give the cards away before I take pictures of them for my blog. That was the case here.I am in love with paper roses. I made this one with some Spellbinders dies (tutorial to come). In person they look they are made out of ceramic. I mounted it on a Spellbinders oval and then colored the edge with my BG11 Copic marker.
The lace is a stamp, which I used on the front and the inside. There is a strip of satin ribbon at the top and two tiny pearls on either side of the filagree oval frame, but their height goes unnoticed because of the massive flower on the front--they just add a little pretty shimmer to pull the inside together. I had to edit out my writing--my mom was nice enough to give it back for me to photograph. She knows my house turns into a twilight zone for other people's things--they take for-e-ver to get back to people once they have entered.
I had to make a box to put this card in as the rose rises almost an inch off the paper. To go with the rose theme, I stamped roses in Autumn Rose and then scored the cardstock to make a box.
You don't expect to get a card when you open a box. :)Paper: PTI - Autumn Rose, Aqua Mist, and Sweet Blush; unknown - cream; Staples - white
Stamps: Kaiser Craft - lace, PTI - Pretty Peonies and Year of Flowers Collection
Ink: Versamark - watermark, PTI - Aqua Mist, Autumn Rose
Embellishments: The Paper Studio - pearls, PTI - Aqua Mist Satin ribbon, Spellbinders - Ovals and Rose Creations, Filagree - gold embossing powder, Cuttlebug - floral embossing folder
Other: foam dimensional adhesive, Cuttlebug, Martha Stewart Crafts- Scoreboard
Fore Your Birthday
Posted by Jenny at 9:00 AM Labels: birthday, cuttlebug, masculine, papertrey ink
I am really liking my On the Links golf themed stamps. They lend themselves easily to masculine cards, but with color changes you can make a feminine one. Glad I purchased this! Now that I am getting older, I have many more friends taking up golf.
The three lighter golf bags were stamped with watermark ink, which made that great green. It needed some oomph so I stamped the golf balls on the edges. Next, I ran it under the Canvas & Linen Impression Plate to give it texture. After I stamped the navy golf bag, I cut it out quickly with a craft knife and adhered it with dimensional foam. I feel like I achieved a bight and masculine card for this one, which totally reflects the recipient for whom I made it.
Paper: PTI - New Leaf, Staples - white, DCWV - The Guy Stack - green plaid
Ink: Versamark - watermark; PTI - Fresh Snow and Enchanted Evening
Stamps: PTI - On the Links
Other: PTI - Canvas & Linen Impression Plate, Cuttlebug, craft knife, dimensional foam
The three lighter golf bags were stamped with watermark ink, which made that great green. It needed some oomph so I stamped the golf balls on the edges. Next, I ran it under the Canvas & Linen Impression Plate to give it texture. After I stamped the navy golf bag, I cut it out quickly with a craft knife and adhered it with dimensional foam. I feel like I achieved a bight and masculine card for this one, which totally reflects the recipient for whom I made it.
Paper: PTI - New Leaf, Staples - white, DCWV - The Guy Stack - green plaid
Ink: Versamark - watermark; PTI - Fresh Snow and Enchanted Evening
Stamps: PTI - On the Links
Other: PTI - Canvas & Linen Impression Plate, Cuttlebug, craft knife, dimensional foam
Reworked Feel Better
Posted by Jenny at 1:33 PM Labels: copics, cuttlebug, get well, papertrey ink
Before
After
I had this card sitting around a few months and knew it needed some umph but didn't have the time to fiddle with it. It finally got some attention and I turned it into this cheerful little number. I took the kraft color ribbon off and replaced it with a vibrant green--it instantly brightened it! Next, I pulled out my Copics and colored in the stamped flowers and leaves. To add more pizzaz, the flower centers got a little bit of lavender Stickles.
I am pretty sure this get well card feels better too now that it got a make over! The original photo made everything orange-y. Blah. My photography and photo editing skills need some attention next. One thing at a time...
Papers: PTI - Berry Sorbet, Melon Berry, and Aqua Mist
Stamps: PTI - Stitches and Swirls, Think Big Favorites #10
Ink: PTI - Plum Pudding, Raspberry Fizz
Embellishments: PTI - Plum Pudding button, Michael's - green grosgrain, Spica glitter pen - clear, Copic - YG13, R22, RV23, Stickles - purple
Other: PTI - Beautiful Blooms II #1 dies, dimensional adhesive
Make It Monday #71: Bordered Sentiments
Posted by Jenny at 3:13 PM Labels: birthday, make it monday, masculine, papertrey ink
For this week's MIM challenge, I chose to do a masculine birthday card with Dot Spot. I always forget about this set, but I like it a lot. I used a good old Sharpie to make my border line.
Instead of stamping a dot in the center, I glued a silicon drop to them. I picked these up last year at a tiny scrapbook shop. They were sold in unmarked bag for dirt cheap and they take Copic marker beautifully. They actually look like beads of water in person.
The inside I kept sentiment free so I could write a nice lengthy note. :)
Thanks for stopping by!
Paper: PTI - Rustic White
Ink: PTI - Enchanted Evening, Simply Chartreuse, Orange Zest
Stamps: PTI - Dot Spot and Think Big Favorites #16
Embellishment: Sharpie - ultra fine navy, handmade silicon drops
Instead of stamping a dot in the center, I glued a silicon drop to them. I picked these up last year at a tiny scrapbook shop. They were sold in unmarked bag for dirt cheap and they take Copic marker beautifully. They actually look like beads of water in person.
The inside I kept sentiment free so I could write a nice lengthy note. :)
Thanks for stopping by!
Paper: PTI - Rustic White
Ink: PTI - Enchanted Evening, Simply Chartreuse, Orange Zest
Stamps: PTI - Dot Spot and Think Big Favorites #16
Embellishment: Sharpie - ultra fine navy, handmade silicon drops
Mr. Darcy
Posted by Jenny at 10:02 PM Labels: birthday, my minds eye, papertrey ink
The sentiment on this card was computer generated, die cut, and stamped. The medallions are a patterned paper and the lace was stamped in Melon Berry. I used a craft knife to cut along the lace edge to make it look realistic.
I wanted an airy feeling ribbon so I opted for seam binding, which I had to double up on since it was too sheer. The camera captured the distinction between the two papers that appears underneath but you couldn't really tell in person. I think the pearls finished the medallions off nicely.
On the inside the sentiment is computer generated again. I think I am in love with this frame.
I cut a medallion out for a cute addition to the back. This is what they looked like before I placed the pearls on them.
Paper: My Mind's Eye - Stella and Rose - Hazel Fancy Doily; Papertrey Ink - vintage cream, simply chartreuse, Georgia Pacific - white cardstock
Ink: PTI - Spring Rain and Melon Berry
Stamps: PTI - Pretty Peonies Anniversary Set and Homemade Hodgepodge, Kaiser Craft - lace
Embellishments: The Paper Studio - Pearls, seam binding - white
Other: Computer, printer, craft knife
Safari Animals Baby Shower Card
Posted by Jenny at 10:20 AM Labels: baby, copics, cuttlebug, masculine, papertrey ink
For this card I stamped my images onto Spring Moss cardstock and colored with them Copics. No fancy shading here since I wanted a simple look. For the stars on the three animals on the bottom, I added sparkle with a clear Spica glitter pen. The banner is hand cut since my Double-Ended Banner die was too narrow for this particular sentiment. I was so excited when these images came out in this larger size (Tremendous Treats); it makes my Tiny Treats set even more versatile!
Paper: Papertrey Ink - Spring Moss, Spring Rain, Orange Zest
Ink: PTI - Soft Snow, Orange Zest; Memento - Tuxedo Black
Stamps: PTI - Tremendous Treats: Birthday, Script Sentiments, Happy Day
Other: PTI - Happy Day die; Copics - E55, R20, R22, C4, C1, C4, B21, Y 15, Y19; Spica Atyou - clear, Cuttlebug
Paper: Papertrey Ink - Spring Moss, Spring Rain, Orange Zest
Ink: PTI - Soft Snow, Orange Zest; Memento - Tuxedo Black
Stamps: PTI - Tremendous Treats: Birthday, Script Sentiments, Happy Day
Other: PTI - Happy Day die; Copics - E55, R20, R22, C4, C1, C4, B21, Y 15, Y19; Spica Atyou - clear, Cuttlebug
Magical Princess Rainbow Card
Posted by Jenny at 3:50 PM Labels: child birthday, copics, cuttlebug, lawn fawn, papertrey ink
I have found that it is normally easier for me to create a card based on a theme. When we got this invite for an upcoming party, I knew what I was going to make!
The chevron rainbow is individual pieces I butted up together and adhered to the card. The hills are three pieces of paper layered and inked for dimension. This is my first time using a Lawn Fawn set and this one is quite fun. There are other whimsical images in the set that I have yet to use. I like how the unicorn's rainbow hair turned out. Good to know I have a nice rainbow assortment of Copics. It was extremely easy as there was no blending to do. I added prisma glitter to its body, which is on the actual invite. Sparkly, sparkly!
I colored the castle with my Copics as well, but used shading this time. The door handles and window openings have Glossy Accents on them to give them shine and dimension. You cannot tell here at all but it there. The castle, unicorn, and hills were hand cut; it made me really appreciate my dies.
On the inside I added more of the flowers that I used on the front. They are simply leftover punched flowers from pink tissue paper my friend gave me after she completed a project. After I glued them down I added a dot of purple Stickles. The sentiments on the front and inside are both heat embossed. I have gotten a lot of use out of this aqua Zing! embossing powder I picked up a few months ago on clearance!
Here is the card with the coordinating gift wrap. Oh, how I enjoy when I can make it all match!
The chevron rainbow is individual pieces I butted up together and adhered to the card. The hills are three pieces of paper layered and inked for dimension. This is my first time using a Lawn Fawn set and this one is quite fun. There are other whimsical images in the set that I have yet to use. I like how the unicorn's rainbow hair turned out. Good to know I have a nice rainbow assortment of Copics. It was extremely easy as there was no blending to do. I added prisma glitter to its body, which is on the actual invite. Sparkly, sparkly!
I colored the castle with my Copics as well, but used shading this time. The door handles and window openings have Glossy Accents on them to give them shine and dimension. You cannot tell here at all but it there. The castle, unicorn, and hills were hand cut; it made me really appreciate my dies.
On the inside I added more of the flowers that I used on the front. They are simply leftover punched flowers from pink tissue paper my friend gave me after she completed a project. After I glued them down I added a dot of purple Stickles. The sentiments on the front and inside are both heat embossed. I have gotten a lot of use out of this aqua Zing! embossing powder I picked up a few months ago on clearance!
Here is the card with the coordinating gift wrap. Oh, how I enjoy when I can make it all match!
This ribbon flower came together quick. I added the ribbon to some Scor-tape and worked the loops into a flower. The flower gemstone finishes it off. The ribbon was attached to the gift al the way around the package with Scor-tape. I was not there when it was opened so I have no idea how hard it was to get into the gift. I am interested in knowing though...
Paper: Papertrey Ink - Raspberry Fizz, Orange Zest, Harvest Gold, Simply Chartreuse, Hawaiian Shores, Wisteria, Spring Rain, Spring Moss, Stampers' Select
Ink: Memento - Tuxedo Black, Versamark - watermark
Stamps: Lawn Fawn - Critters Ever After
Other: prism glitter; PTI - chevron die; Zing! - aqua embossing powder; heat tool; pink tissue paper; Stickles - purple; Copics - V01, V12, V15, BV0000, RV21, RV23, RV25, RV29, 0, Y15, YR16, B24, YG 13, T1; Michael's ribbons - yellow, green, purple saddle stitch; Ribbon Boutique - aqua ribbon, Hero Arts - purple flower gem, Glossy Accents, dimensional adhesives, craft knife
Copics to Fix Bleach Spots!
Posted by Jenny at 12:04 PM Labels: copics, crafts other than paper crafts
Ever wonder how Copic on fabric would work? Well, I had the chance to find out...
Look what I did to one of my son's fairly new pair of shorts. Eeeek! I already know my next wash machine will not have a trixy area to pour bleach into because things like this happen. Instead of tossing them or banning them to the "play clothes only" life, (that doesn't work, by the way, as he somehow gets out of the house with those clothes) I tried coloring the area with my Copics.
It worked! This is a few washings later. If you look where the spots were you can see a fainter blue. I think if I had other tones of blue it would have worked better perhaps, but my B21 and B24 did a nice job. The blue did bleed onto the white stitching a little but it is in an inconspicuous spot since his shirts cover the top of the pocket anyhow. One for the win column!
About Me
- Jenny
- Papercrafting makes me happy. I don't have nearly as much time as I would like to play with all my craft goodness so when I can create something it is a joy.
Subscribe via email
Search This Blog
Labels
- authentique (1)
- baby (10)
- bachelorette (1)
- birthday (34)
- blank cards (11)
- blog hop (2)
- bo bunny (2)
- card set (1)
- challenge (7)
- child birthday (14)
- Christmas (2)
- close to my heart (3)
- congratulations (2)
- copics (17)
- cosmo cricket (2)
- crafts other than paper crafts (3)
- cricut (28)
- cuttlebug (46)
- echo park (3)
- flowers (5)
- get well (3)
- house warming (1)
- invitation (4)
- jenny bowlin (1)
- justrite (3)
- lawn fawn (1)
- make it monday (3)
- masculine (24)
- my minds eye (10)
- paper crafts other than cards (5)
- papertrey ink (85)
- pebbles (2)
- shadow boxes (1)
- spellbinders (10)
- sympathy (1)
- thank you (8)
- tutorial (1)
- valentines (4)
- wedding (5)
- WOF series (9)
- Your Heart (1)
Archive
Fab Crafting Blogs
Followers
Powered by Blogger.
Powered by WordPress
©
Salt Paperie - Designed by Matt, Blogger templates by Blog and Web.
Powered by Blogger.
Powered by Blogger.